Embed the Client app on your website
The Client widget replaces an exam link with an iframe so examinees can take an assessment inside an approved website.
You need:
- an examina.io account and plan that supports embedding;
- access to Home → Settings;
- an exam imported into Manager;
- permission to edit the host website; and
- basic HTML knowledge.
1. Create a public API key
Open Home → Settings → API Keys & Webhook and create an API Public Key.
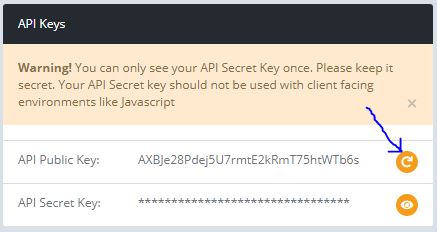
Simple embedding uses only the public key. Do not place the API Secret Key in browser code.
Regenerating the public key requires every widget installation to be updated.
2. Approve the website domain
In Approved Domains and Sub-domains for Client Widget embedding:
- Enter the hostname without a protocol or path.
- Select Add Domain.
For example, enter assessment.example.edu, not
https://assessment.example.edu/exams.
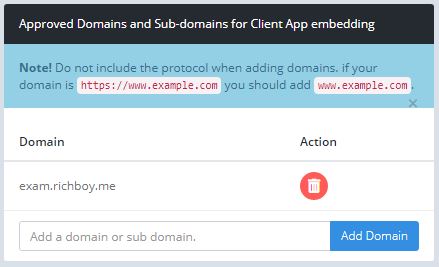
For local testing, add the hostname you actually use, such as localhost or
127.0.0.1; do not include the port. Remove development hosts after testing.
Avoid allowing every domain in production.
3. Load the widget script
Add the widget script to the page and replace YOUR_PUBLIC_API_KEY:
<!doctype html>
<html lang="en">
<head>
  <meta charset="utf-8">
  <meta name="viewport" content="width=device-width, initial-scale=1">
  <title>Take the assessment</title>
  <script
    src="https://www.examina.io/client/widget.js?apiKey=YOUR_PUBLIC_API_KEY">
  </script>
</head>
<body>
  <h1>Readiness assessment</h1>
</body>
</html>
If the key is missing or invalid, the widget script will not load correctly.
4. Add the exam link
In Manager, select the exam and choose Open Exam Link. Copy the URL.
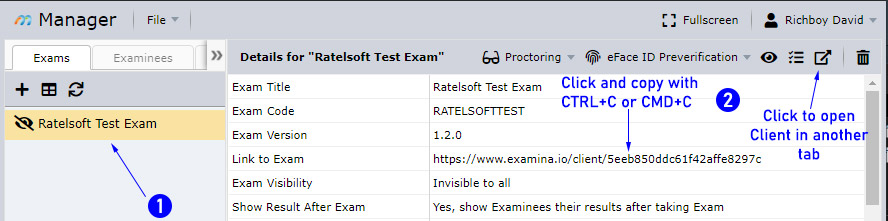
Add the link with the examina-io-client-widget class:
<a
  class="examina-io-client-widget"
  href="https://www.examina.io/client/YOUR_EXAM_ID">
  Open the exam
</a>
When JavaScript is available, the widget replaces the anchor with the embedded Client. The anchor text remains a useful fallback if the script cannot run. Place only one widget anchor on a page.
Control the widget dimensions
The widget uses these optional attributes:
data-examina-io-heightdata-examina-io-width
If an attribute is omitted, the widget manages that dimension relative to the browser window and can adjust it when the window resizes.
Use:
- a positive number for a fixed pixel dimension;
- a negative number to use the window size minus that number of pixels; or
autoto leave that dimension to your CSS or browser defaults.
This example reserves 64 pixels for a page header and lets CSS manage width:
<header class="exam-header">Readiness assessment</header>
<a
  class="examina-io-client-widget"
  href="https://www.examina.io/client/YOUR_EXAM_ID"
  data-examina-io-height="-64"
  data-examina-io-width="auto">
  Open the exam
</a>
Test at the smallest supported viewport. When using auto, apply an explicit
CSS size to the resulting layout so the browser's default iframe size is not
used accidentally.
Complete responsive example
<!doctype html>
<html lang="en">
<head>
  <meta charset="utf-8">
  <meta name="viewport" content="width=device-width, initial-scale=1">
  <title>Readiness assessment</title>
  <script
    src="https://www.examina.io/client/widget.js?apiKey=YOUR_PUBLIC_API_KEY">
  </script>
  <style>
    html, body { margin: 0; }
    .exam-header { box-sizing: border-box; height: 64px; padding: 20px; }
  </style>
</head>
<body>
  <header class="exam-header">Readiness assessment</header>
  <a
    class="examina-io-client-widget"
    href="https://www.examina.io/client/YOUR_EXAM_ID"
    data-examina-io-height="-64"
    data-examina-io-width="auto">
    Open the exam
  </a>
</body>
</html>
Optional autologin
If your own site has already authenticated the examinee, your backend can request a short-lived exam login token and add it to the Client link. The API Secret Key must stay on your server.
Backend flow:
- Authenticate the person in your application.
- Resolve their examina.io examinee code or ID on the server.
- From your server, call one of the documented token endpoints with HTTPS Basic Authentication:
/login/exam/{examId}/code/{examineeCode}/token/login/exam/{examId}/id/{examineeId}/token- Build the Client URL with URL-encoded query values.
- Render the public key and the time-limited login URL to the approved page.
Example link shape:
<a
class="examina-io-client-widget"
href="https://www.examina.io/client/YOUR_EXAM_ID?autologin=true&examineeCode=URL_ENCODED_CODE&token=URL_ENCODED_TOKEN"
data-examina-io-height="-64"
data-examina-io-width="auto">
Open the exam
</a>
autologin must be true. Supply either examineeCode or examineeId;
when both are present, Client uses the examinee code.
Never generate tokens in browser JavaScript, expose the secret key to the examinee, or log a complete autologin URL.
Production checklist
- The exact production hostname is approved.
- The page and all embedded resources use HTTPS.
- The API Secret Key is absent from page source and browser network requests.
- The fallback link is understandable.
- One widget is present on the page.
- Desktop, mobile, keyboard, and resize behavior have been tested.
- A fictional mapped examinee can sign in or autologin and complete the exam.
- Temporary development domains have been removed.
For credential setup and rotation, see API keys and webhooks. For endpoint schemas, use the API reference.